
In the new year I suggested to my husband that I would like to visit Walcheren before finishing my book. He looked interested, but not that interested, so I decided to up the ante.
Me: We could cycle it.
Husband (perking up): What, you mean the whole way?
Me: Why not?
Husband: And camp?
Me: ………. All right.
Husband: You’re on.

How we travelled
And so we planned an Easter trip (because, you know, Russian roulette with the weather is all part of the fun). Arrangements were made for the kids to go to their grandparents; I made a suggested itinerary, compiled a long list of likely campsites, booked train tickets and ferries, and we packed. As lightly as possible, as we would be cycling 450 km (280 miles) on a tandem.
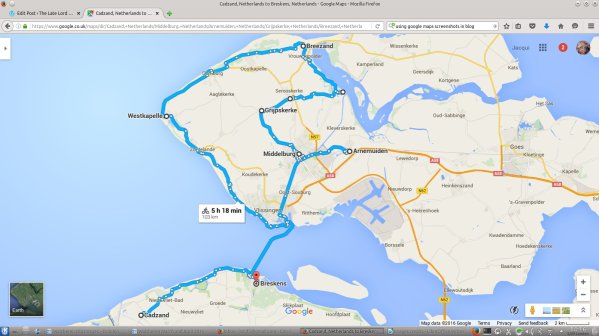
Our whole trip, including trains between Oxford and West Folkestone (with some cycling in London between stations) and the ferries across the Channel, looked something like this:

Map data ©2016 Google
A (brief) historical note
For those of you who are not au fait with the Walcheren Expedition of 1809, this, in a rather rotten nutshell, is what happened.

Map from Fortescue, History of the British Army VII (supplement). Image from here
The Walcheren expedition was Britain’s contribution to the Fifth Coalition with Austria. Austria would conduct the main continental campaign against Napoleon while Britain engaged in a diversionary attack in an area of her own choosing. Britain chose a “coup de main” against Antwerp, which was a huge French dockyard and commercial centre. Destroying Antwerp would be a cheap way for Britain to neutralise the danger of French invasion, pierce Napoleon’s Continental System which was damaging British trade, and draw Napoleon’s attention away from Austrian action inland. Unfortunately the Battle of Wagram put Austria out of the war before the Walcheren expedition even started, but the campaign continued anyway in the hope that victory would keep Austria in the war.
Lord Chatham was appointed to command the military part of the biggest expeditionary force fielded by Britain so far during the war: about 40,000 soldiers and over 600 vessels, more than 200 of which were warships. Sir Richard Strachan commanded the naval part of the expedition.
The expedition consisted of four parts. The smallest, under Lord Huntly, would land on the Cadzand shore and neutralise the French battery at Breskens, allowing the main part of the fleet to enter the West Scheldt. Meanwhile, 12,000 men under Chatham’s second-in-command, Sir Eyre Coote, would lay siege to Vlissingen (Flushing). The reserve under Sir John Hope would take control of the neighbouring island of Suid-Beveland, allowing the remaining 20,000 men under Chatham himself to sail all the way to Sandvliet, reduce the largest forts protecting the narrow part of the Scheldt (Lillo and Liefkenshoek), and march on to destroy the dockyards of Antwerp.
Things went wrong almost immediately. The expedition sailed (late) at the end of July, and ran into a storm. Home Popham, the unofficial Captain of the Fleet, saved the expedition by sailing it into the sheltered Roompot and through the Veere Gat at the furthest point of Walcheren, but this meant most of the expedition (except for Huntly) were now in the East rather than the West Scheldt. Meanwhile, Lord Huntly failed to land at Cadzand, which meant the Breskens battery remained active and continued to reinforce Flushing by boat. This meant the British ships could only enter the West Scheldt through the sandbank-filled Sloe Passage separating Walcheren and Suid-Beveland. Understandably, it took time and effort to get hundreds of troop and supply transports through to the West Scheldt.
Chatham and Coote landed on Walcheren on 30 July 1809 at Breezand and initially made swift progress. By 3 August, all Walcheren except Flushing and all Suid Beveland were in British hands. At this stage the campaign stalled. The British fleet could not get into position to complete the siege of Flushing because of unfavourable winds, and the French continued reinforcing the town until 7 or 8 August. Because of this Chatham was forced to reinforce Coote from the men destined for Antwerp, putting that part of the plan on hold until Flushing fell. With no time for a slow siege, bombardment was the only option, but the British batteries were slow to build due to poor weather and did not open until 13 August. After two days of intensive bombardment Flushing fell, and after a short delay Chatham moved onto Suid-Beveland to continue to Antwerp.
By this time, however, the French had managed to bring 35,000 men to the area, removed their fleet further upriver, and repaired their fortifications. At about this time, sickness also broke out among the British troops. By the end of August a quarter of the army was out of action with a crippling combination of malaria, dysentery, typhus, and typhoid. Chatham called off the expedition on 27 August, and returned to England in mid-September with the bulk of the army. The politicians had hoped to retain the valuable commercial base of Walcheren, and 16,000 men remained there with that in mind, but by December it was clear possessing the island was not worth the cost of defending it and it was evacuated.
Thankfully, our expedition was rather more successful, although we didn’t get to Antwerp either………..
The Walcheren Expedition of 1809 2016: Days 1-2
The first two days were, essentially, spent just getting there. We left Oxford at 3:00 am on 28 March, caught the train to West Folkestone, and cycled the remaining distance across the cliffs to Dover (grrrmbllr engineering works grrmmbbllr). The beginning of our journey was considerably enlivened by Storm Katie, which decided to break the night before we left. We had one cancelled train because of a tree on the line, and some delays, but apart from that Katie did little but give us a very rough ferry journey and then a tailwind on the other side (wheeeeeeeeeee).
We spent the first night in De Panne (Belgium), and on the second day reached Cadzand.
From here on, here’s a more detailed map of our Walcheren cycling:
Map data ©2016 Google
Day 3 (30 March): Cadzand – Breskens – Vlissingen – Middelburg – Arnemuiden
We hit the coast pretty quickly after leaving Cadzand, and pretty much immediately we had our first sight of Walcheren:

First sight of Walcheren!
If you consult the map at the top of this page, you can see we were approaching Vlissingen (Flushing) along the Wielingen Channel, which forms the opening to the West Scheldt. This was where Lord Huntly failed to land and disable the Breskens battery, which continued reinforcing Flushing for most of the siege. Flushing, incidentally, is the town on the right with the tall buildings.
We proceeded to Breskens, where we caught the ferry across to Flushing. I thought about the French reinforcements for Flushing making the same journey in 1809 under the nose of the British ships, rendered completely inactive by the contrary winds. I wonder if they indulged in a few rounds of “Your mother was a hamster, &c” as they went. I imagine they probably did.

Once in Flushing, I was expecting to find the place looking very new and shiny with very few pre-1809 buildings surviving. The devastation of Chatham’s August 1809 bombardment was, by all accounts, pretty extensive.

Flushing Town Hall during the bombardment, from here
I was agreeably surprised to find the town full of 16th and 17th century buildings. I daresay most of them lost their roof in 1809, and probably again in 1944, when the British returned to flatten Flushing a second time (this time by RAF bombing). There is quite a lot about the role of Walcheren in WWII on the island: several plaques, statues, monuments, museums, etc etc etc. There is virtually no sign of the 1809 expedition, however, which goes to show that victories are much more likely to be remembered than failures, particularly when said victories occurred within living memory.


Some of the fortifications were 16th century, although most dated from 1812, when the damage the British made to the harbour on leaving in 1809 was repaired. There was a windmill from 1699 on the seafront though, which appears in many prints of the bombardment of Flushing.

British assault on Flushing from “France Militaire”, showing the 1699 windmill
After leaving Flushing, we made our way to Middelburg. Middelburg was where Chatham established his main headquarters, from 1 August 1809 until he moved to Suid-Beveland on 21 August. He returned there at the beginning of September.


Middelburg is still the capital of Zeeland, and a mighty pretty place it is too. The anonymous author of Letters from Flushing (London, 1809, pp. 109, 145, 207) described it as “an Amsterdam in miniature”, a fortified town with eight gates and twelve basions “with large and deep ditches filled with water”. Another source (Journal of the Walcheren Campaign, University of Michigan Coote MSS Box 29/3) wrote:
Middelburg, the Capital of Dutch Zealand, is a very handsome opulent town, well paved & lighted. The streets are pretty regular, and the houses very well built. … The appearance of the Town denotes a great degree of ease & opulence. … The Town is surrounded with a wide wet ditch of regular Bastions, but there are no Guns mounted on the Ramparts & the environs are so covered wth habitations & Plantations, that It could make no defence, so long as they were suffered to exist. The Groote Kercke, or principal church has a handsome steeple & very melodious chimes, which are for ever in play.
I can testify to the church chimes being “very melodious” and “for ever in play”. I could imagine Chatham being kept awake by them at *cough* ten o’clock in the morning *cough*.
He stayed in the Abbey while in Middelburg. The “Lange Jan” (“Long John”) church tower is attached to this. It is now the Zeeuws Museum, and therefore accessible to the public, although it was gutted during WWII. Some of the fixtures seem to be original, though:


Yes, I probably spent more time looking at the fixtures than at the museum exhibits (those were interesting too).
The Abbey itself (it closed in 1574) is a magnificent building, and I can totally understand why Chatham spent so much time there.
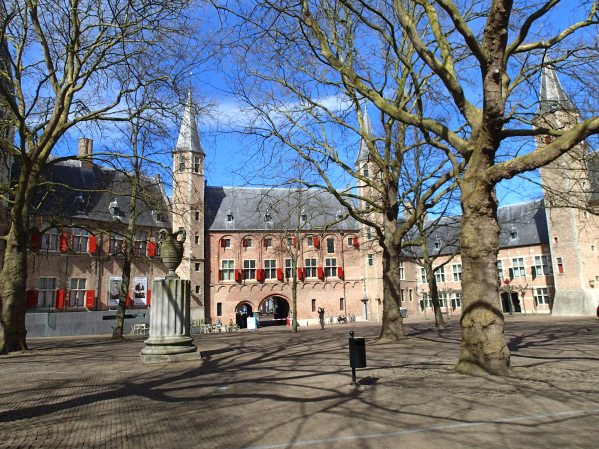
Middelburg Abbey
We wandered about Middelburg for a couple of happy hours. I should mention that at this stage of the trip I had not yet fully realised where we were yet and so the full import of our location had not yet penetrated. I suppose on some level I was kind of aware I was in the place I had been reading about for so long, but I think it was only when we reached Veere, the next day, that I truly realised WE WERE ON WALCHEREN.
But that is for Part 2…
(And, as it turns out, because I’m utterly incapable of concision, Part 3)

I was interested in reading your blog, as I am off to explore Scotland in 10 days, for my Historical Fiction novel. Thankyou for your interesting article and example. 🙂
Cheers,
Linda from British Columbia, Canada
Glad to hear you found it interesting! Enjoy your own trip– there’s nothing like “being on the spot”!
Nicely done.
Thank you. With luck the next trip might involve a meet-up?
Hi,
I am really interested in your post, as my wife & I are doing this trip at the end of May. I am really interested in the failed invasion & anything that is still there to visit/see…my wife is looking at shopping & sightseeing!
We are booked into a hotel in Vlissingen & I would appreciate any tips or pointers you could give me.
Greg.
Dear Greg, I’m pleased to make the acquaintance of someone else interested in the campaign. Not many people seem to know much about it! The easiest thing is probably to esend me a message through the forform on the About Me page and I will reply to that in a couple of days with more info for you. 🙂 — Jacqueline
Pingback: The Walcheren Expedition: 2016 (Part 2) | The Late Lord
Pingback: The Walcheren Expedition: 2016 (Part 3) | The Late Lord