About a year ago I did a considerable amount of research on the Anglo-Russian Helder expedition of 1799 (you can read more about that here). John Pitt, 2nd Earl of Chatham had returned to his military career in 1798, and was appointed to the command of the 7th Brigade in the expedition. My novel follows him to Holland, and last week I finally got the opportunity to do some location research. My husband and I hired a tandem, took a train from Amsterdam to Den Helder, and cycled through the most important locations associated with the campaign.
What follows is Part 2 of the account of my research trip. Part 1 can be found here.

Day Two (conclusion): Alkmaar
We spent a little time exploring Alkmaar. As mentioned in yesterday’s post, Alkmaar was the second headquarters of the Allied force. The Dutch General Daendels had previously used Alkmaar as his headquarters, but was forced to move out when the British advanced from Schagerbrug in the wake of the 2 October 1799 action. The Duke of York established himself in Daendels’ evacuated HQ.
Alkmaar must have been a pleasant change after the middle-of-nowhere that was Schagerbrug, although the British and Russians were only able to enjoy it for slightly less than a week. Now mainly known for its weekly cheese market, Alkmaar was without a doubt the most beautiful of the towns we visited. In 1799 the town was surrounded by “a thick wall, faced with brick, about three miles in circumference, and strengthened with bastions at regular intervals” (E. Walsh, Narrative of the Expedition to Holland … (London, 1800) p 70). Now only the moat survives, but the Old Town, with canals running through its main streets lined with warehouses, cannot have changed much in two hundred years.

Warehouses by the canal in Alkmaar
In one of those odd twists of fate, I was just telling my husband that I did not know where exactly the Duke of York’s headquarters were when we came upon an elegant Rococo-style building with a plaque next to the front door. Between us my husband and I managed to make out enough of the plaque’s Dutch to gather that we had, quite coincidentally, located the building used by the Duke as his HQ.

The headquarters of the Duke of York at Alkmaar
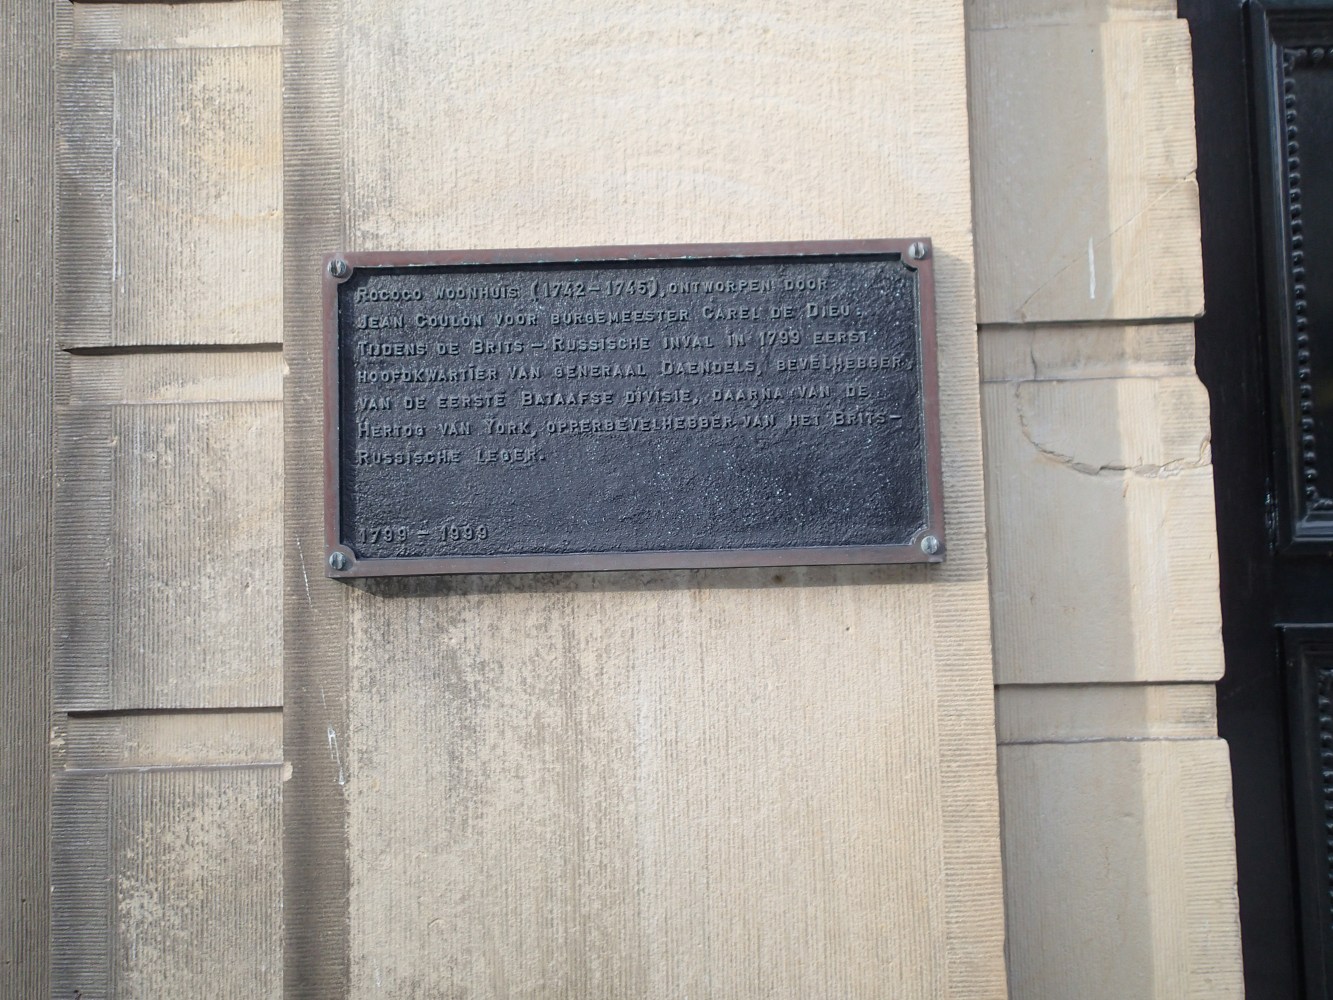
Plaque marking the headquarters of the Duke of York at Alkmaar
This house was originally built for the mayor of Alkmaar and must have been the best house in the town. It was just opposite the town hall, which was itself an extremely impressive building.
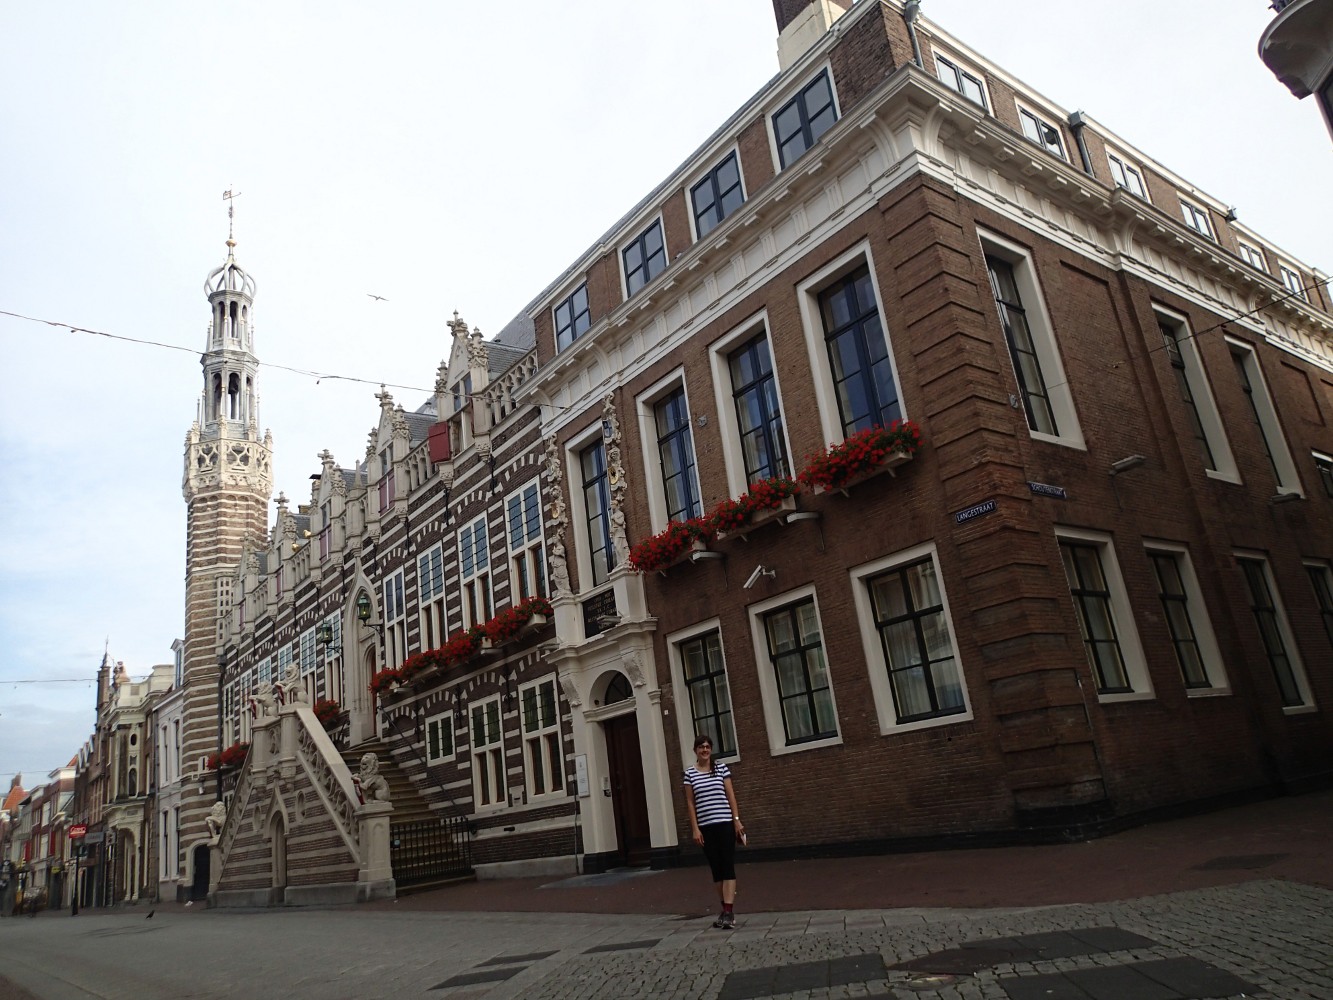
Alkmaar’s town hall
At one end of the main street was a church, the 15th century Sint-Laurenskerk. During the battle of 6 October 1799 the rain was so heavy and the visibility so bad that the Duke of York, who remained at Alkmaar throughout, sent one of his aides up the church tower to try his best to work out what was going on!

Sint Laurenskerk in Alkmaar. The Duke of York sent his aide-de-camp up this church tower to see what was going on during the 6 October action
Day Three: Alkmaar – Egmond-aan-Zee – Castricum – Wijk-aan-Zee
We were up super early on Day 3 in order to benefit from the weather, which continued glorious. Our intention was to follow Lord Chatham’s steps on the 6 October 1799, during the Anglo-British assault on the towns of Castricum. The battle grew out of the Allied attempt to extend their line to the south in preparation for an attack on the new French/Dutch headquarters at Beverwijk, but turned into a full-on unexpected scrap when the French poured their entire resources into repulsing them. The French commander Brune himself charged the British at the head of his cavalry. The end result was a victory for the Allies, but a Pyrrhic one, and they subsequently retreated back to Schagerbrug and shortly after gave up the whole campaign for lost.
I also wanted to go back towards Egmond-aan-Zee, since I had made a discovery just before bed the night before. Chatham’s movements on 6 October were rather nebulous, since official reports of the battle were comparatively sketchy. His activity can be deduced only from the fact that his brigade (along with that of Lord Cavan) suffered the most casualties. I’m still not entirely sure where and how he was deployed, and nobody else seems to have worked it out either. The great Sir John Fortescue also failed to work it out, but came to the following, somewhat unprofessional, conclusion anyway:
The brigade that suffered most severely was Chatham’s, in which the three battalions of the Fourth lost nearly 150 officers and men killed and wounded, and over 500, including 13 officers, prisoners; while the 31st lost over 100 killed and wounded and 33 prisoners. In what part of the field these battalions were engaged I have been unable to discover, but under so incompetent a brigadier they were likely to come to misfortune in any position (Fortescue, History of the British Army IV (II) 697)
To which I of course say “Hey!”, since in my opinion this is a 20/20 hindsight conclusion to make, particularly as Fortescue admits he does not know where Chatham was to be found.
The large number of captured troops was due to the poor weather on the day of the battle. The Sun of 16 October 1799 contained the following account:

From looking over the Army Lists the captured units clearly belonged to Lieutenant Colonel Cholmondeley, who was captured along with a number of several of his officers. They were exchanged the following year.
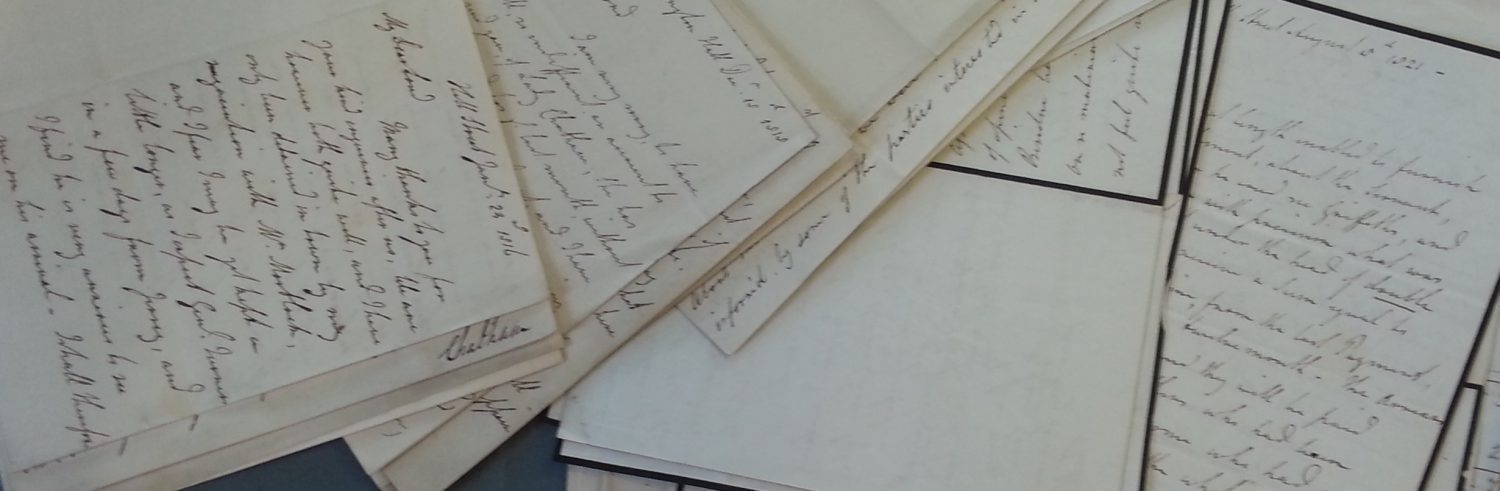
I had spent the previous evening in our hotel reading through my 1799 campaign notes, and I thought I was beginning to work out what Chatham might have been doing on 6 October. My initial impression of the post-2 October campaign was that Chatham had remained with General Dundas and followed the same order of battle on the 6th as on the 2nd, but I found the following letter from Chatham to his mother quoted in my own notes:
Egmont: Oct 4 [1799]
My dear Mother,
I have but a moment to write to you a single line to say that I am perfectly well … We succeeded in a general attack on the enemy on Wednesday … and I moved in the course of yesterday before this place to reinforce Sir R[alph] Abercrombie [sic], but the enemy, on his approach, unmasked the place, and we have marched in this morning. (Quoted in Lord Ashbourne, Pitt: Some Chapters of his Life and Times (London, 1898), pp 168-9)
From this it seems clear that Chatham did not remain with the division of 2 October, but joined with Abercromby at Egmont, with whom he presumably remained for the action of 6 October.
So back to Egmont we went. Egmont is now a tiny, generic seaside resort town, and although there were a few old buildings left, most of them now converted to shops selling miscellaneous seaside-related tat. It was clearly nestled right in the middle of the dunes, however, and must have been in quite a commanding strategic position in 1799.

Dunes rising near Egmond-aan-Zee
From Egmont we cycled back through the dunes towards Castricum, passing through Heiloo and Limmen on the way: two villages where the Russian force received a strong check from the French on 6 October, and where I originally thought Chatham’s men might have come unstuck. The dunes here strongly resembled the ones north of Egmont, rising up and down for miles between the sea and the flat polders of the interior. Once again, it was obvious that British infantry would have had a hard time marching up and down without being split up into divisions. The sand underfoot gave way easily, though it was largely kept in place by the omnipresent scrub and heather.

Scrubland on the dunes near Castricum
As I mentioned before, the weather on 6 October 1799 was awful in the extreme, with driving rain on and off from early afternoon until long into the night. In wet, misty conditions the visibility in the dunes cannot have been good. I do not know how Lt Col Cholmondeley’s division got separated from the rest of Chatham’s brigade, but one thing is for sure: this was not ideal terrain for the British troops.
After a lot of up-and-downing (who knew there were quite so many hills in Holland?!) the land flattened out towards Castricum. Like Egmont, today it is a nondescript seaside town, very modern.

After lunch we cycled on towards Beverwijk. Once again we entered the dunes. Somewhere on this terrain Lord Chatham received a spent musket ball to the shoulder, which glanced off his epaulette but apparently forced off his coat and waistcoat on its path. Obviously I couldn’t tell exactly where, but it was odd to be on the spot I had read about so many times.

Dunes between Castricum and Beverwijk. If you squint you can juuuust see my husband
We did not manage to get into Beverwijk that day, but stopped at our hotel at Wijk-aan-Zee. In 1799 much fighting took place in this tiny village; now it’s a beach resort. Because it was such a lovely day we had to paddle, and I took an amazing shot of the sand dunes rising away to the north.

Beach at Wijk-aan-Zee looking down towards the bigger dunes in the north
Day Four: Wijk-aan-Zee – Beverwijk – Amsterdam
Much like the British and Russians, the push to Beverwijk was our last effort. In 1799, the Allied forces fell back on a long, nightmarish march to Schagerbrug, where the decision was made on 14 October to abandon the campaign and return home. A convention was signed with General Brune on the 18th by which the British and Russians were to be permitted to re-embark unmolested in return for the release of eight thousand French prisoners of war.
We decided to pop into Beverwijk to see if we could see any trace of its 1799 past, but we might as well not have bothered. Like Castricum, Beverwijk is virtually 100% modern. We found the church, which was clearly very old, and one or two older-looking houses close to the shopping centre, but otherwise, since we were not there to spend money in a high street boutique, we high-tailed it.

After getting snarled up in Beverwijk’s spaghetti-like network of motorway and dual carriageway junctions, we managed to find our way out and spent the next hour and a half or so cycling into Amsterdam, which we reached in time for lunch.
Following in the footsteps of the Helder campaign was quite an experience, and one I have been planning for nearly a year. I am very glad we managed to see the terrain. Needless to say the relevant chapters in my novel will be getting a significant rewrite!


